 |
Peano
|
|
Peano
|
This notebook makes sure that your machine is ready for the ExaHyPE 2 tutorials. Work through it once before you start with any other tutorial. When you are done,
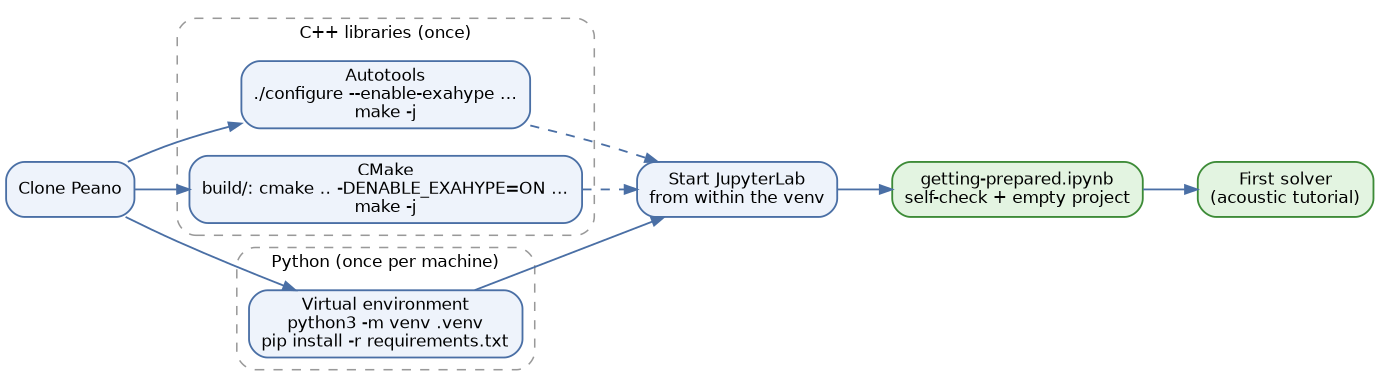
--enable-blockstructured --enable-exahype (Autotools) or -DENABLE_BLOCKSTRUCTURED=ON -DENABLE_EXAHYPE=ON (CMake). Parallel runs additionally need --enable-loadbalancing or -DENABLE_LOADBALANCING=ON, respectively.Peano's Python API is spread over two source roots: src holds peano4.api, the new exahype2.api and all toolboxes, while python still hosts the legacy exahype2 package that is currently being migrated. Both define a top-level package called exahype2, and Python takes whichever it finds first on its search path:
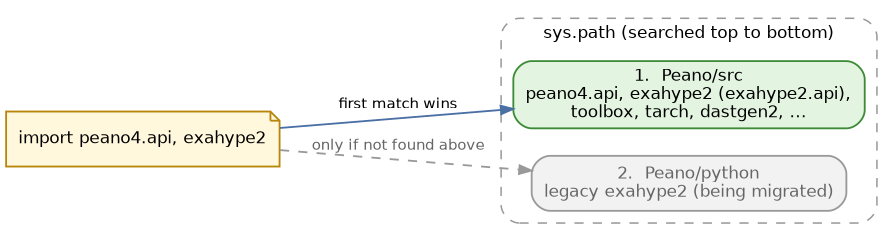
The tutorials use the new API. The cell below therefore puts src at the very front of the search path. It does no harm if you have set your PYTHONPATH already or installed the API into your virtual environment.
Every ExaHyPE project starts with the obligatory imports. Peano and ExaHyPE greet you with an ASCII art banner. If you get warnings about invalid escape sequences, you can ignore them: Peano's in-code documentation uses LaTeX formulae, and these confuse some Python versions.
The following cell checks your setup and tells you what to fix. It also defines two parameters that we use throughout this notebook: the dimension and the build flavour (compile mode). Each compile mode links against libraries with a different postfix, e.g. libExaHyPE2Core2d_asserts.a for ASSERTS, so the flavour you pick has to be built. Available modes are RELEASE, ASSERTS, DEBUG, TRACE and STATS.
Every ExaHyPE project defines a sequence of lowering steps. That is, we start with an ExaHyPE project object. This represents the domain level, where we do the maths. After that, we lower this project into a Peano project. This is a technical representation (still in Python) of the arising algorithm, i.e. something that represents the actual code base realising our domain knowledge. Finally, we ask Peano to lower this project into native C++ code plus a Makefile.
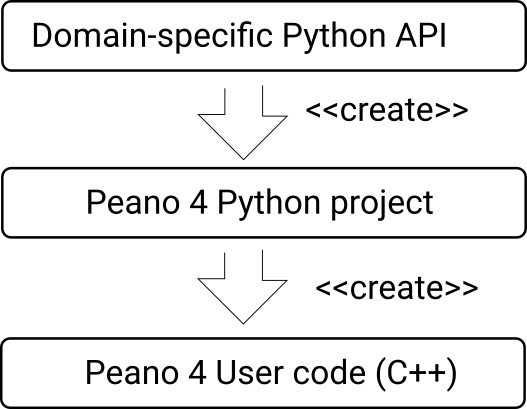
The term lowering stems from the compiler community, where it is used to discuss different domain-specific languages and their abstraction levels.
Before we lower the project, we tell it which domain to work on, how long to simulate and how often to plot. These parameters end up as constants in the generated C++ code, so they have to be set before the lowering. We use the unit square here.
Real projects also add solvers at this point. We skip this here, as we only want to check the workflow.
set_Peano4_installation() takes Peano's root directory plus the compile mode. It inspects your build and picks up compiler and linker settings from it:
config.log and src/Makefile in the root directory;PeanoTargets.cmake, such as build. If your build directory lives elsewhere, point the environment variable PEANO_CMAKE_BUILD_DIR to it.generate_Peano4_project() then lowers the ExaHyPE project into a Peano project, and generate() dumps the C++ code plus a Makefile.
The generated code follows the generic Architecture of any code built on top of Peano:
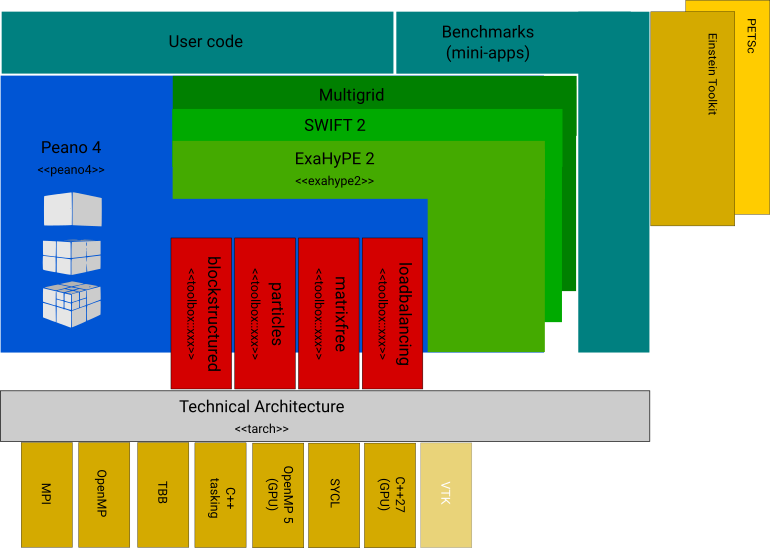
A domain-specific code sits on top of some extensions plus the Peano core, and all of the components use a common technical architecture. Let's look at what we got:
Makefile builds the executable. Use it on the command line or from within the notebook.Constants.h holds the global simulation parameters from above.gettingprepared-main.cpp and gettingprepared-main.h are the main routine.repositories and runners hold the glue code that drives the mesh traversals..gitignore lists all generated files, so you can put your project under version control right away.README-*.md summarises how the project has been configured, and log.md logs what the Python API has done. Both are named after the script that ran the lowering. Within a notebook, this is Jupyter's kernel launcher.All of these files are regenerated whenever you rerun the lowering, so do not edit them by hand. Once you add a solver, ExaHyPE also generates the solver's implementation files. These are created only once and never overwritten: they are yours to edit. make clean removes the build output and the generated sources, but leaves your solver implementation alone.
Now compile the code:
There is nothing to run yet: our project has no solver, so there is nothing to step through. We run our first simulation in the next tutorial.
ExaHyPE codes can be very chatty. On startup, the executable reads a log filter file called exahype2.log-filter from its working directory. If the file is missing, the code warns and prints everything. Use set_log_filter_file() on the project if you prefer a different file name. Each line of the file reads
level namespace rank black|white phase
where rank -1 means all ranks, and white switches the matching messages on and black switches them off. The cell below writes a filter that shows ExaHyPE's messages, but hides those of the Peano core, the technical architecture and the toolboxes. See Logging, tracing, statistics, profiling and assertions for all details. There are many further examples in the repository: search for files ending in log-filter.
tutorials/exahype2. Adapt peano_root in the path cell.peano_root points to the wrong directory, or Peano has not been configured or built yet.mode and rerun the lowering.dimensions to 3 in the self-check cell and rerun the notebook: the self-check tells you whether you have the 3d libraries, too.set_global_simulation_parameters() in the documentation of exahype2.api.Project to see what else you can configure.  1.9.8